If you’ve ever sent an STL to a slicer and gotten a warning about “non-manifold edges,” “open surfaces,” or a model that prints with mysterious gaps and inside-out walls, you’ve hit the single most common problem in 3D printing: a broken mesh.
3D Lab Viewer now diagnoses and repairs these problems for you. Open a model, see exactly what’s wrong, and fix it – weld stray vertices, fill holes, flip reversed faces, drop junk fragments, or remesh the whole thing into a guaranteed-solid model. All of it runs locally in your browser, free, with no upload and no desktop tools, at viewer.3dlab.id.
Why Mesh Repair Matters
A slicer needs a watertight mesh – a closed surface with a well-defined inside and outside – to figure out where to lay plastic. Real-world files often aren’t watertight, because they come from:
- 3D scans – surfaces with holes where the scanner couldn’t see, plus noise and stray fragments
- Sculpting / boolean operations – self-intersections and non-manifold edges where shapes were combined
- Bad exports – “triangle soup” where faces don’t actually share vertices, so the mesh looks solid but has invisible cracks
- Mixed-up normals – faces pointing inward, which slicers read as a void
The classic fix has been desktop software: Netfabb, Meshmixer, Microsoft 3D Builder, or Blender. That means installing something, learning its interface, and round-tripping your file just to close a few holes. Now you can do it in the tab you’re already viewing the model in.
Step 1: See What’s Wrong
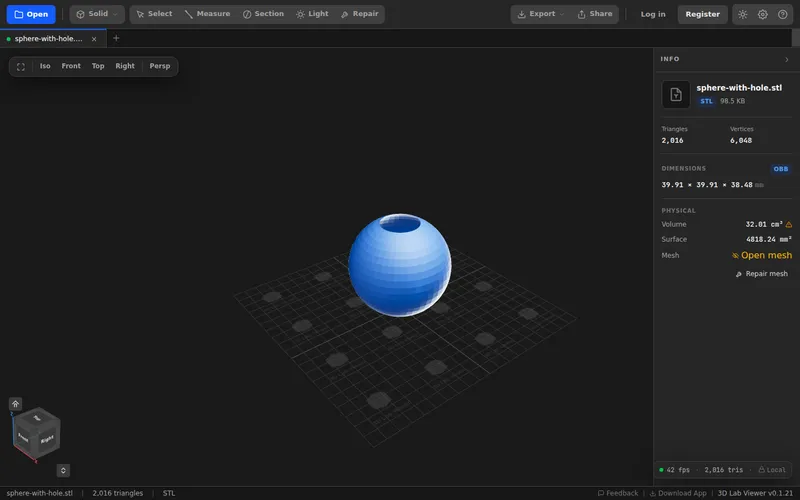
Before you fix anything, the viewer tells you whether you need to. Open any model and the Info panel reports a Mesh status:
- Watertight (green) – the mesh is closed and manifold; you’re good to print.
- Open mesh (amber) – there are boundary holes in the surface.
- Non-manifold (amber) – edges shared by the wrong number of faces, or other topology errors.
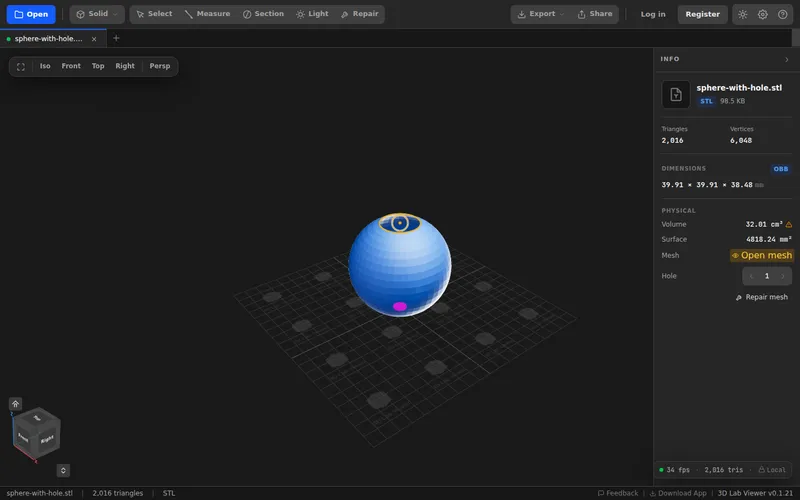
When a mesh isn’t watertight, click the status to highlight the problem edges right in the 3D view – open and non-manifold edges light up so you can see exactly where the damage is. If the model has holes, a hole navigator appears: step the camera from one opening to the next so you can find even a tiny one-triangle gap that’s impossible to spot by eye.
Once you know what’s broken, hit the Repair mesh button (or press Shift + R) to open the repair tools.
Step 2: Surgical Repair
The repair panel runs a set of focused, non-destructive operations. Each is a checkbox, so you choose exactly what to apply – and you can revert any time. They run in a safe fixed order:
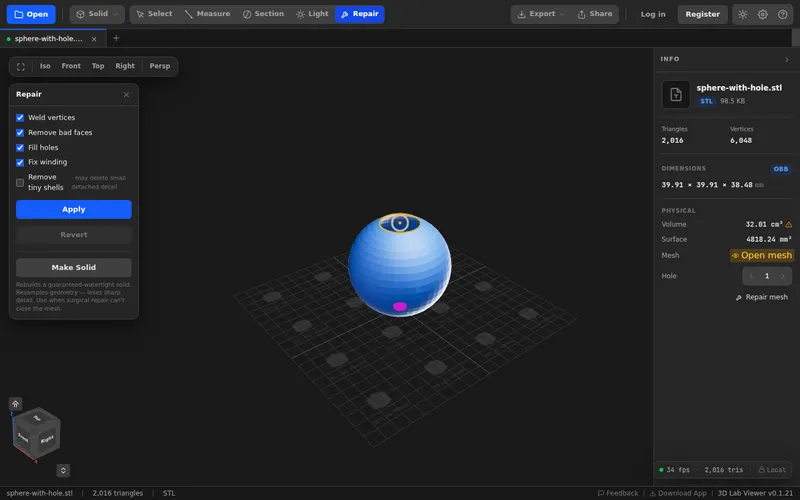
Weld vertices
Merges duplicate and coincident vertices that sit on top of each other. This is the foundation fix: it stitches “triangle soup” back into a connected surface so adjacent faces actually share edges. The merge distance is scale-aware (derived from the model’s size), so it works on a 5 mm part and a 5 m one alike.
Remove bad faces
Deletes degenerate faces (zero-area slivers) and exact duplicate faces that confuse slicers and contribute nothing to the surface.
Fill holes
Closes boundary loops – the open holes in the surface – with new triangles. Pathologically huge openings are left alone, since a giant opening is usually intentional (a designed cavity) rather than a defect.
Fix winding
Makes every face’s winding consistent and points all normals outward. This fixes the inside-out, patchy-shading look and gives the slicer a reliable inside/outside. It runs after hole-fill so patched areas inherit the correct orientation.
Remove tiny shells
Drops disconnected fragments that are a negligible fraction of the model’s volume – the floating specks of scanner noise. This one is off by default, because “tiny detached piece” sometimes means a small intentional detail you don’t want deleted.
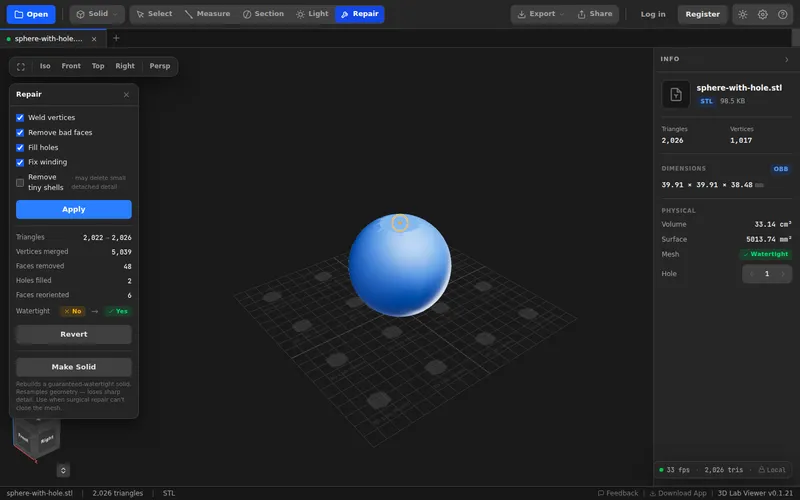
The before/after report
When you click Apply, the panel shows a precise diff of what changed:
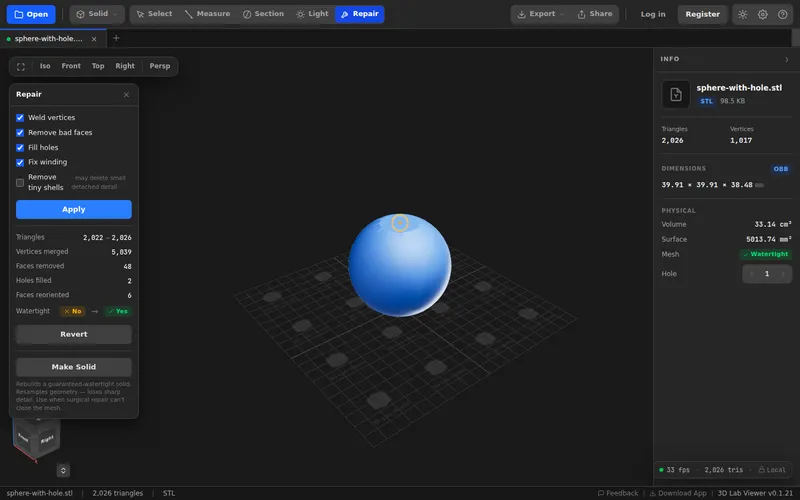
| Metric | What it tells you |
|---|---|
| Triangles | Face count before → after |
| Vertices merged | How many duplicates were welded |
| Faces removed | Degenerate/duplicate faces cleaned |
| Holes filled | Boundary loops closed |
| Faces reoriented | Reversed faces flipped outward |
| Shells removed | Junk fragments dropped |
| Watertight | No → Yes, the bottom line |
That last row is the one that matters: it confirms whether the model is now closed and ready to slice.
Step 3: Make Solid (When Repair Isn’t Enough)
Some meshes are too far gone for surgical repair – heavy self-intersections, swiss-cheese scans, tangled non-manifold soup. For those, there’s Make Solid.
Make Solid resamples the entire model into a voxel field and re-extracts a brand-new surface that is guaranteed watertight. It will close almost anything. The trade-off is that it’s lossy: because it rebuilds the geometry from scratch, sharp edges get rounded and the triangle count changes. It’s the sledgehammer for when the scalpel can’t finish the job.
The viewer is honest about its limits: if the input is an open or thin-shell surface (a typical single-sided scan) where “inside” and “outside” aren’t well defined, Make Solid won’t pretend it succeeded – it keeps your original model and warns you instead of replacing it with garbage.
Your Files Never Leave Your Device
Every repair operation – diagnosis, welding, hole-filling, remeshing – runs entirely in your browser, on a background thread so the interface stays smooth even on large models. Nothing is uploaded to a server just to be repaired. For proprietary parts and client work, that’s a real advantage over online repair services that require you to hand over the file.
Real-World Use Cases
3D printing service intake
At 3D Lab Bali, a big share of customer STLs arrive non-watertight. Instead of bouncing the file back or opening a separate repair app, we open it in the viewer, see the amber “Open mesh” flag, fill the holes, confirm “Watertight: Yes,” and move straight to slicing.
Workflow: Upload → check Mesh status → highlight holes → Apply repair → confirm watertight → slice
Cleaning up a 3D scan
A scanned object comes in with holes on the bottom, normal noise, and a few floating specks. Turn on Fill holes, Fix winding, and Remove tiny shells, apply, and the scan becomes a printable solid – or reach for Make Solid if the scan is especially rough.
Fixing sculpts and boolean results
Models built by combining shapes often have non-manifold edges. Weld + cleanup + fix-winding resolves most of them; Make Solid handles the stubborn intersecting cases.
How It Compares
| Desktop repair tools | 3D Lab Viewer | |
|---|---|---|
| Install required | Yes (Netfabb, Meshmixer, Blender…) | No – runs in the browser |
| File upload to a server | Sometimes (online services) | Never – fully local |
| See where the defect is | Varies | Highlighted edges + hole navigator |
| Before/after confidence | Manual re-check | Watertight diff report |
| Cost | Paid or steep learning curve | Free |
Supported Formats
Repair works with the viewer’s standard upload formats:
- STL (the 3D printing standard – and the format that needs repair most)
- OBJ
- 3MF
- STEP/STP
- GLB/GLTF
After repairing, export the result back out to STL, OBJ, 3MF, or GLB and drop it straight into your slicer.
Tips for Best Results
- Start with the defaults. Weld, remove bad faces, fill holes, and fix winding are on by default and resolve the majority of files in one click.
- Diagnose before you fix. Highlight the open edges first so you understand whether you’re dealing with a couple of holes or a structural mess.
- Leave “Remove tiny shells” off unless you can see junk fragments – it can delete small intended details.
- Reach for Make Solid last. It always closes the mesh but loses sharp detail; use it only when surgical repair can’t get to watertight.
- Check the diff. If “Watertight” still reads “No” after a pass, try enabling more operations or escalate to Make Solid.
Frequently Asked Questions
Q: Does repair change my original file? A: No. Repair works on the loaded model in-memory and you can Revert at any time. To keep the fixed version, export it as a new file.
Q: Why is my mesh “non-manifold” if it looks fine? A: Visual appearance doesn’t reveal topology. Edges shared by more than two faces, or vertices that aren’t actually joined, look solid but break slicing. Highlight the edges to see them.
Q: What’s the difference between repair and Make Solid? A: Repair is surgical – it targets specific defects while preserving your original surface and its detail. Make Solid rebuilds the whole surface to force watertightness, which closes anything but resamples (and softens) detail.
Q: Is there a size limit? A: Very large meshes (millions of triangles) will warn before running heavy operations, since repair is computational. Most printable parts are well within range.
Q: Does this work on mobile? A: Yes – the viewer runs in any modern browser, including on phones, and there’s also a desktop app. Very large meshes are best repaired on a desktop, where there’s more memory and processing headroom.
Try It Now
Head to viewer.3dlab.id, drop in an STL, and check the Mesh status in the Info panel. If it’s amber, press Shift + R and click Apply – most files go watertight in a single click.
Next steps after repairing:
- Check the model’s envelope with the bounding box tool
- Verify critical dimensions with the measurement tools
- Share the fixed model with colleagues and clients via a link
- Speed up the workflow with keyboard shortcuts (press ? in the viewer)
Feedback & Feature Requests
Mesh repair is an area we’ll keep expanding. On the radar:
- Per-defect repair (fix one hole at a time)
- Adjustable Make Solid resolution for finer detail
- A printability report combining repair status, dimensions, and volume
Tell us what would help your workflow via GitHub Issues or the feedback form on the site.
Built for makers, engineers, and print shops who need a clean, printable mesh without leaving the browser.